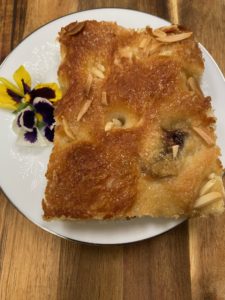
Amaretto-Cherry Focaccia
Focaccia, normally a savory flatbread steeped in herbed olive oil, becomes a sweet pastry by using light oil, dried fruit, and a topping of sugar. We make it in a smaller pan, which results in taller, softer bread. Stopping the rise (by placing it in the refrigerator overnight) allows for better bread flavor development. Time is always the secret ingredient with bread.
This is a variation of Peter Reinhart’s Sweet Raisin Focaccia from The Bread Baker’s Apprentice.
Diet: Vegetarian, Vegan, Dairy-free, Contains Nuts
Ingredients:
- 2½ cup bread flour
- 1 tsp salt
- 1 tsp yeast
- ½ cup + 3 Tbsp light olive oil (not extra-virgin, any light vegetable oil will do, actually)
- 1 tsp cinnamon
- 1 tsp vanilla extract
- 1 cup water (plus a few tablespoons more if needed)
- 1½ cups dried cherries
- ½ cup amaretto
- 2-3 Tbsp white granulated sugar for topping
- sliced almonds for topping
Instructions:
-
Place cherries, amaretto, and enough water to cover in a sauce pan over low heat and bring to a simmer.
-
Remove from heat an allow cherries to absorb liquid and cool down for at least one hour.
-
Combine flour, salt, yeast, cinnamon, vanilla, and the 3 Tbsp oil in a mixing bowl fitted with a dough hook.
-
Add water. I start by decanting the water the cherries have soaked in. This will color the bread red.
-
Allow the mixer to knead the dough until you have a smooth, sticky ball, adding more water if needed. A good indication is that the dough sticks to the bottom of the bowl but not the sides. (If mixing by hand, you will need to knead within the bowl since this is a wet and sticky dough.)
-
Turn dough onto floured surface and allow to rest for 5 minutes.
-
Stretch to dough out to at least twice its size and spread the cherries evenly over the dough.
-
Then fold it, letter style so that all the cherries are inside the dough.
-
Let the dough rest for 30 minutes and repeat the stretching/folding steps.
-
Allow to rest 30 more minutes and repeat the stretching/folding for the third time.
-
After waiting 30-60 minutes more, place the dough into the baking pan (I use a 10" X 12" pan) that has had half of the olive oil poured into it.
-
Pour remaining olive oil over the dough. Using only your finger tips, stretch the dough out towards the sides of the pan. Do not worry about getting the dough all the way out to the corners, it will stretch better as it relaxes in the refrigerator. It will look like too much oil, but the dough will absorb it as it bakes.
-
Refrigerate the dough overnight (or up to 3 days).
-
Remove from refrigerator and allow to warm up and rise for 2-3 hours, occasionally stretching it to fill the pan with your fingertips. It will still look like it is swimming in oil.
-
Traditional focaccia should be about one inch thick at this point, but ours is twice as thick. If you like it more crusty and crispy, use a larger pan to stretch to dough thinner.
-
Place in a preheated 450° F oven and bake for 10 minutes, turn and bake an additional 10 minutes until golden brown and delicious.
-
Allow to cool for 5 minutes, then remove from pan and allow to cool for an additional 15 minutes. You will note most, if not all, of the oil has been absorbed by the bread.
Recipe By: Chef at Castle in the Country - January 23, 2024


